Game Essentials
There are a number of items that you will need to play a game of Blood Bowl. From the likes of Pitches and Dugouts on which to actually play, to items such as templates, dice and tokens that you will make constant use of as you execute plays and attempt to score those all-important Touchdowns!
In this section, we will take you through everything you will need to play a game of Blood Bowl, explain what they are all used for and tell you anything else you need to know about them.
NUFFLE'S SACRED TURF!
Blood Bowl pitches can be found all across the Old World; from the sweltering jungle forests of Lustria where ancient stadia are built into the great temple-cities hidden in the trees, to the frozen wastes of Norsca where pitches are carved into great ice floes and lined with huge wooden structures, and everywhere and everything in-between. Some pitches are more subtle affairs, featuring crudely drawn gridirons marked out with chalk or jumpers and surrounded with meagre bleachers, whilst others are grand stadia that can hold tens of thousands of supporters at a time to witness sporting glory.
Regardless of the stadia in question, every pitch (from temporary playing fields to the splendour of the Emperor Luitpold I Memorial stadium (home of the Blood Bowl itself)) will be laid out to the same regulation size as set out in the sacred Tome of Nuffle, and enforced by members of the Referees and Allied Rulekeepers Guild (RARG).
THE BLOOD BOWL PITCH
A Blood Bowl Pitch is split into a number of sections, each of which will need explaining before you get started, as some of them will dictate where you can set up your players later on. Each of these are numbered on the diagram below to show you exactly where they are.
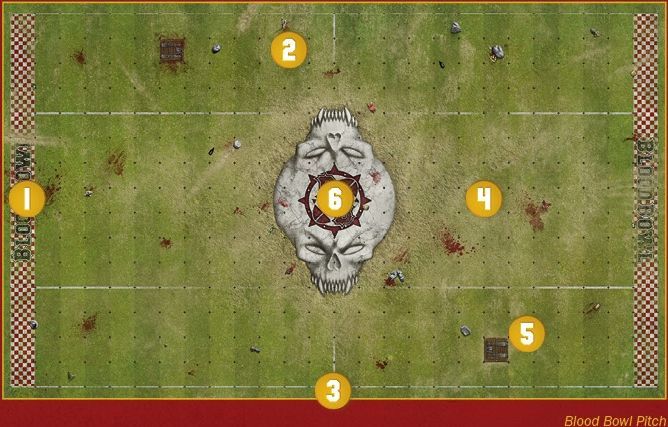
- END ZONES: The areas at the short edges of the pitch where players are trying to get the ball to score a Touchdown.
- WIDE ZONES: These are the areas on either side of the pitch that run the length of the pitch from End Zone to End Zone. They are four squares wide.
- SIDELINES: These run the length of the pitch from End Zone to End Zone and denote the edge of the pitch.
- CENTRE FIELD: This is the area in the middle of the pitch between the two Wide Zones that runs from End Zone to End Zone.
- LINE OF SCRIMMAGE: The pitch is split into two halves down the centre line between the two longer board edges. This is called the Line of Scrimmage.
- TRAPDOORS: Each half has a single Trapdoor within one of its Wide Zones.
DUGOUTS
At the side of the pitch, each team will have their own Dugout. This is where they will place any players that are not currently playing the game (out of choice or not!) as well as track important in-game information such as what Turn it is, how many Team Re-rolls the team has left and, perhaps most importantly, how many Touchdowns the team has scored. The Dugout has a number of different sections, each of which are explained here:

- RESERVES BOX: This is where any fit and healthy players are placed, ready for the next Drive.
- KNOCKED-OUT BOX: This is where any Knocked-out players are placed in order to try to recover later in the game.
- CASUALTY BOX: Where those players that can take no further part in the game are placed, either because of a crippling injury, or sometimes even worse...
- TURN TRACKER: This is where a team places their Turn Marker. These are important for keeping track of what Turn it is, and how many Turns a team has left until the end of the half.
- TEAM RE-ROLL TRACKER: This is where a team places their Team Re-roll Marker, which is used for tracking how many Team Re-rolls a team currently has remaining for the half.
- SCORE TRACKER: A rather important feature! Whenever a team scores a Touchdown, they will record it here.
SPORTING PARAPHERNALIA!
Blood Bowl teams rarely travel light; there are all manner of things required when a team travels to play. The team itself will require the likes of kit, boots, helmets and half-time snacks, whilst the Coach will need all their playbooks - and that's before you take into account the pom-poms and ribbons of the cheerleading squad, the bandages, saws and tools of the apothecaries, and so on. To put it bluntly, there is a lot of stuff that needs to be hauled from stadium to stadium!
On the tabletop, games of Blood Bowl also have a number of key items required to play - though thankfully not to the same ridiculous extent as a professional Blood Bowl team! In this section we will run through all the various bits that Coaches will need when they play a game of Blood Bowl.
THE FOOTBALL
The football is arguably the most important thing on the pitch; after all, it's what both teams need in order to score! When not in possession of a player, the ball is placed on the ground wholly within one square. Whilst a player is in possession of the ball, it will be placed on their base to show that they have hold of it.
The ball is an essential part of any game, and is most commonly represented by a model just like your players. Every Blood Bowl team will come with at least one Blood Bowl ball that can be used in your games.
MARKERS
Blood Bowl uses a number of Markers that help Coaches track important information during the course of the game. These will be placed on the relevant tracker on your team's Dugout so that the information is clear to all Coaches.
TURN MARKER
You will need a Turn Marker to keep track of what Turn it is. The first thing you do at the start of each of your Turns is move your Turn Marker up one space on your Turn Tracker. If your opponent forgets to do this, politely remind them to do so.
TEAM RE-ROLL MARKER
You will also need a Team Re-roll Marker to keep track of how many Team Re-rolls you have remaining. You may either use a single Team Re-roll Marker and move it down one space whenever you use a Team Re-roll, or you can use multiple and simply remove one each time you use a Team Re-roll instead, whichever you prefer.
SCORE MARKER
A Score Marker is used to track the number of Touchdowns your team has scored - a rather important thing to keep note of! Each time you score a Touchdown, move your Score Marker up one space.
TEMPLATES
Blood Bowl also uses three unique templates that help with different aspects of the game. These are the Random Direction Template, the Throw-in Template and the Range Ruler.
RANDOM DIRECTION TEMPLATE
This template is used whenever something is required to Scatter or Deviate, as described on page 34. It is placed next to the pitch so that both Coaches can easily see it and so that it corresponds to the grid on the pitch. Whenever something requires the Random Direction Template, such as when Scattering or Deviating, roll a D8 and move the object to the square corresponding to the roll as shown in the diagram below:

THROW-IN TEMPLATE
Sometimes you will be asked to determine the direction of something using the Throw-in Template. Usually this will be a Throw-in, but there are some other obscure instances where you may also use the Throw-in Template as well (such as when using the Ball & Chain Trait).
When using the Throw-in Template, place the Blood Bowl logo over the square the object is moving from and position the template so it is facing the desired direction as determined by the rule in question. Then roll a D6 to see which way the object will move.

RANGE RULER
The Range Ruler is used primarily during a Pass Action or a Throw Team-mate Action to determine the range of a Pass, or to see if any opposition players are able to attempt to Intercept the ball. The number of stitches on the ball in each section of the Range Ruler determines the type of Pass a player will attempt to throw the ball that far, as described on page 70.

BLOOD BOWL DICE
Blood Bowl uses a variety of different dice to determine the outcome of various actions. The likes of blocking, passing, dodging and so forth are all worked out using various different types of dice. Being the patron of Blood Bowl, Nuffle takes a keen interest in dice and it is often said that if a Coach or player has particularly poor dice rolls then they have likely angered Nuffle in some way - or more likely Nuffle has decided to mess with them!
Below are the different types of dice you will come across in a game of Blood Bowl.

D6
Blood Bowl primarily uses ordinary six-sided dice, marked 1 to 6. These are referred to as a D6, and if the rules ask you to roll a D6, it is one of these dice you will need to roll.
Sometimes you may be asked to roll a D3; to do this, roll a D6 and half the value shown on the dice, rounding any fractions up. Other times you may be asked to roll 2D6, which is a multiple dice roll and requires two D6s to be rolled and added together, to give a result between 2 and 12.
BLOCK DICE
These six-sided dice are unique to Blood Bowl and feature a number of icons on them. These are used when a player performs a Block Action, as described on page 60, and can result in the player knocking down their opponent or even end up being knocked over themselves!
D8
This is an eight-sided dice, marked 1 to 8. This is mainly used in conjunction with the Random Direction Template, but you also may find it used in other instances as well. Regardless, when the rules ask you to roll a D8, this is the dice you will roll.
D16
Finally, this is a sixteen-sided dice, marked 1 to 16. This is probably the least common dice that will be rolled during the game, however, when the rules ask you to roll a D16, this is the dice you will roll.
BLOOD BOWL TOKENS
Below are the different types of tokens you will come across in a game of Blood Bowl, all of which are included in the Blood Bowl Third Season boxed game. Whilst these are provided unpainted, we recommend painting them in the colours listed below. Not only will this help differentiate them from each other, but it will also make it really clear to everyone exactly what effect that token represents by looking at the colour of the token.
PRONE TOKEN - YELLOW
![]()
This denotes that the player is Prone (see page 39), and is used instead of laying models down on their back (as they used to be in previous editions). The other side of this token is a Stunned token.
STUNNED TOKEN - RED

This denotes that the player is Stunned (see page 39), and is used instead of laying models down on their front (as they used to be in previous editions). This is found on the reverse of the Prone token, meaning that when a player reverts from being Stunned to Prone, you can simply flip the token over as well.
DISTRACTED TOKEN - BLUE

Many effects in Blood Bowl will confer the Distracted condition onto a player (see page 39). Using this token is a great way of making sure coaches are aware of which players are Distracted and therefore don't have a Tackle Zone, and cannot use Active Skills or Traits.
BLITZ TOKEN - GOLD

Only a single player can declare a Blitz Action each turn (see page 64), and so placing this token next to a player who has performed a Blitz Action is a good way of making sure coaches don't forget and try to declare a second one in the same turn by accident.
DODGY SNACK TOKEN - GREEN

When the Dodgy Snack result is rolled on the Kick-off Event Table (see page 48), it's a good idea to mark the affected players with these tokens so both coaches remember who is suffering the effects!
EYE GOUGE TOKEN - PURPLE
![]()
The Eye Gouge Skill (see page 128) means that affected players cannot provide Offensive or Defensive Assists when other players are performing a Block Action. To ensure this isn't overlooked, these tokens will help coaches remember who is affected.
ROOTED TOKEN - BROWN
![]()
In the unfortunate event that a Treeman becomes Rooted (see page 137) - or fortunate if you are on the opposing team - place a Rooted token next to them to make sure that they remain in place until the condition ends.
CHOMPED TOKEN - WHITE

Players affected by the Chomped condition (see page 131) cannot move until the player chomping them relinquishes them - either willingly or by force! Placing a Chomped token next to affected players serves as an important reminder.
BALL TOKEN

The ball token has two sides, one showing that the ball is loose and the other showing that a player has possession of the ball. The 'in possession' side is also indented allowing a player on a 32mm base to fit inside making it really easy to see where the ball is at a moment's glance!
There is even a hole for a Blood Bowl ball with a peg to be slotted in for that extra level of detail.
THROWN PLAYER TOKEN

When a player is being thrown by a team-mate (see page 76) it is a good idea to have a marker showing where the player will currently land. This also helps when Scattering the player so that you don't have to move the thrown player until the final destination is determined. The reverse of this token is the Bomb token.
BOMB TOKEN

When a player uses the Bombardier Trait (see page 125) they will need to choose a square to throw the bomb at and then Scatter it as per the Trait's description. To make it easy to see where the bomb is being thrown, use this token to mark its current position on the pitch. The reverse of this token is the Thrown Player token.